Timeline
What is Timeline?
Timeline Quick View
Setting up pins
Calendar set up
Weather set up
Timeline 101 Video
What is timeline?
Simply press the Down button from your watchface to view your customized timeline full of meaningful pinned events from your calendar and other apps.
- Immediate or ongoing events will be listed first. Current events will be listed until the scheduled end time.
- Keep scrolling down to view your upcoming events and other information about today and beyond.
- Your Pebble timeline is unique and completely customizable. You decide what you want to appear on your timeline from the apps and information that will mean the most to you.
While the information is neatly summarized to get you the information you need as quickly as possible, simply press the Select button on any pin to find out more detailed information.
Timeline Quick View
 Timeline Quick View shows your upcoming timeline event directly on your watchface.
- To dismiss the notice, press the Back button
- To view details about your event, press the Down button to go into your Timeline and see the associated pin
- Press the Select button to see more information
- Go into the main menu on your watch
- Select 'Settings', then open 'Timeline'
- Turn Quick View off or adjust how soon it shows up on your Timeline
Please note: this feature is currently limited to Pebble Time, Time Steel, Pebble 2, and Time 2 watches.
Setting up pins
When you download a watchapp, it will appear in your Pebble mobile app, displayed in the "My Pebble" section. From that list, you will be able to change the settings for the watchapp and decide if you would like it to push information to your timeline.
Simply tap on the watchapp you're interested in. If it has information that it is able to incorporate into your timeline, there will be the option to "Show pins" listed. Make sure that the switch is in the 'on' position, with the indicator on the right side and orange.
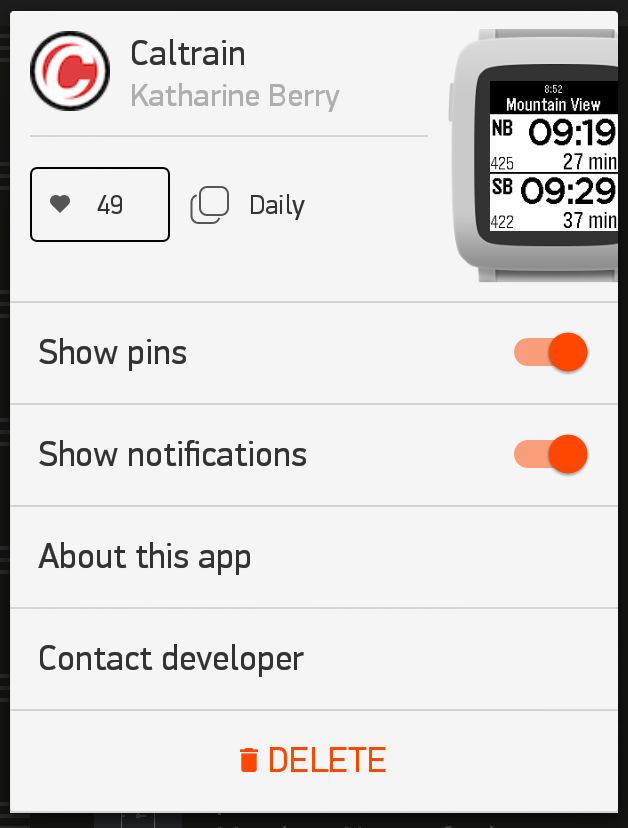
If the option to show pins is not listed and you have an idea of how you'd like it displayed in your timeline, we recommend contacting the developer (the option should be listed at the bottom of the app details), to let them know.
Watch the video below for a practical use of timeline pins!
Calendar sync comes as a default option with the Pebble mobile app, so there is no need to search or download anything to be able to use this feature.
Within the Pebble app, go to the Apps section. Calendar will be listed at the top. It is the only watchapp that you cannot reorder within that list.
To set up your Calendars with Pebble Time, tap on the gear icon on the right side of the screen or the Settings option from the app details. It will pull up a list of the accounts on your phone that have calendars associated with them, and any sub-calendars within that account. To the right of the individual titles, there is a check-box option.

Simply check any box beside a calendar that you would like to sync with your Pebble Time.
Conversely, make sure that the box remains unchecked for any calendars you would like to exclude.
If you do not see any accounts listed, but you do use a digital calendar, be sure to add that account to your smartphone so that our app can detect it.
For help setting up calendars on your iOS device, please visit Apple Support.
For help setting up Google calendars on your phone or tablet, please visit Google Support.
Once your calendars are set up, tap the "<CALENDAR" option in the top left to go back to the Apps / timeline page.
The last step to make sure that your events and appointments appear on your timeline is to make sure it has permissions to "Show pins". Tap Calendar to reveal more app details, and make sure that the switch is in the 'on' position, with the indicator on the right side and orange.

You're all set!
Your timeline will sync approximately 48 hours worth of events: 24 hours of the past, and 24 hours of the future. This means that your immediate timeline will remain accessible even if your Pebble Time becomes disconnected from your phone.
Weather comes as a default option with the Pebble mobile app, so there is no need to search or download anything to be able to use this feature.
Within the Pebble app, go to Apps section. Weather will be listed second from the top.
To set up your weather with Pebble Time, tap on the gear icon on the right side of the screen or the Settings option from the app details. From there you will be able to select which unit measurements would be most meaningful to you (Celsius, Fahrenheit, or mixed). You can also choose to have the weather reported to you by GPS location or enter a city. There is also the option to include multiple cities, which is very useful for anyone who lives in one city and works in or regularly visits another.
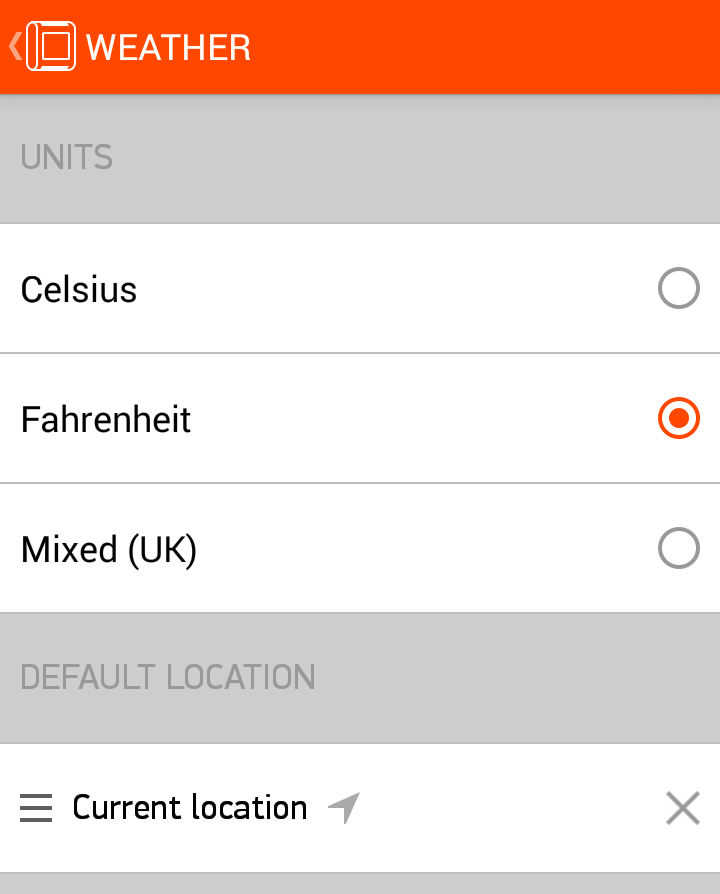
Once your preferences are set, tap the "<WEATHER" option in the top left to go back to the Apps / timeline page.
The last step to make sure that weather forecasts appear on your timeline is to make sure it has permissions to "Show pins". Tap Weather to reveal more app details, and make sure that the switch is in the 'on' position, with the indicator on the right side and orange.

You're all set!
Your timeline will sync approximately 48 hours worth of events: 24 hours of the past, and 24 hours of the future. This means that your immediate timeline, with weather details, will remain accessible even if your Pebble Time becomes disconnected from your phone.
Timeline 101 Video
For more information, please check out the video below!